
Creating Imports by defining an Import Specification
29 min
There are two main parts to creating an import; creating the worksheet that will be used to capture the data and creating the import specification that will be used to import and map the data to the correct class and slot in Essential.
Key Terms
Capture Spreadsheet – The spreadsheet that allows the capture of bulk data.
Import Spec – Specifies which classes and slots to send the data in the spreadsheet to
Reference Repository(Cloud Only) – defined in import settings, supplies the classes and slots available to the import utility
Target Repository (Open Source Only) – defined in import settings, supplies the classes and slots available to the import utility
Data Sources – Defines the source of data for an import, usually an excel spreadsheet
DUP – Data Update Pack – contains the data from the Capture Spreadsheet in a form that can be applied to Essential directly
Completing the Capture Spreadsheet
The pre-defined capture spreadsheet has three types of the worksheet:
Definition Worksheets – Where you define lists of instances to be imported
Mapping Worksheets – Where you map-related instances together
Reference Worksheets – Worksheets containing Essential Reference information such as Lifecycles or Deployment Status
Defining the Worksheet
The key part of the process is in identifying upfront the information you need to capture. Having identified the question you want to answer, and the view that will enable you to provide the answer, you need to assess what information is required to populate that view.
Having done this, you need to break the information down into the instances you will create in the definition worksheets and the relationships you need to create in the mapping worksheets. You need to understand the classes and slots that the views use; you can see this from the How To’s on the website, or from analysing the view itself. Once you understand the data required, you also need to understand the relationships between the data, again, you can use the How To’s on the website or you can look in the repository itself.
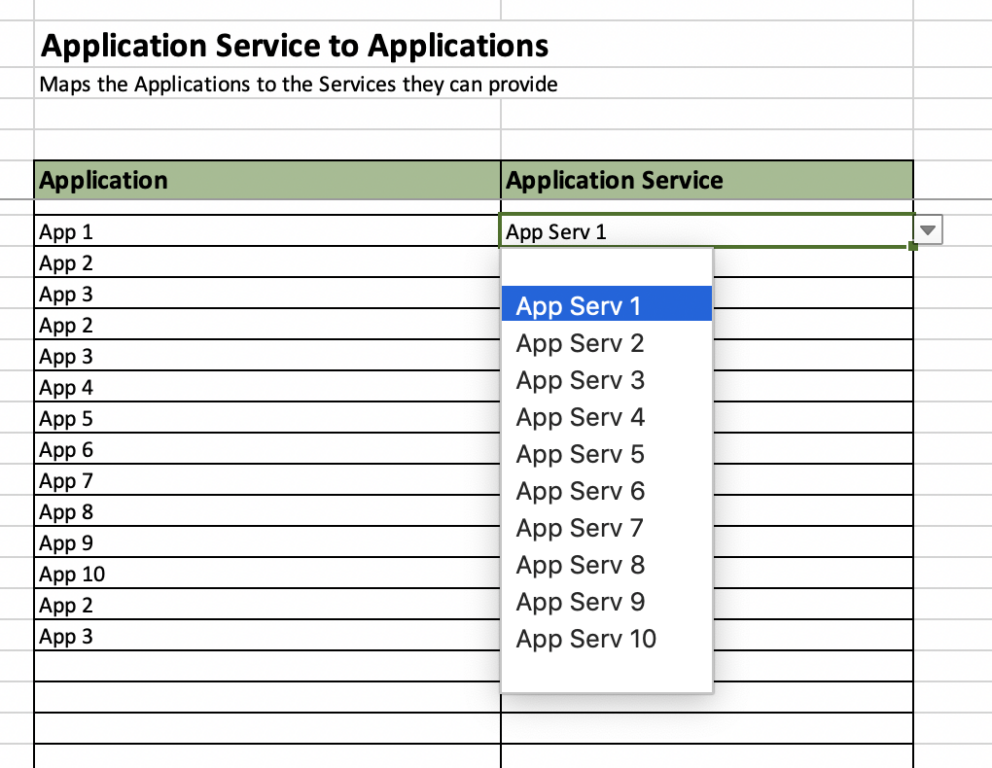
As a simple example, if you wanted to understand what services are provided by your applications, you would need to capture:
- The applications in a definition worksheet
- The application services in a definition worksheet
- The relationships between them in a mapping worksheet, to populate the Application Provide Role class
Creating the Worksheet
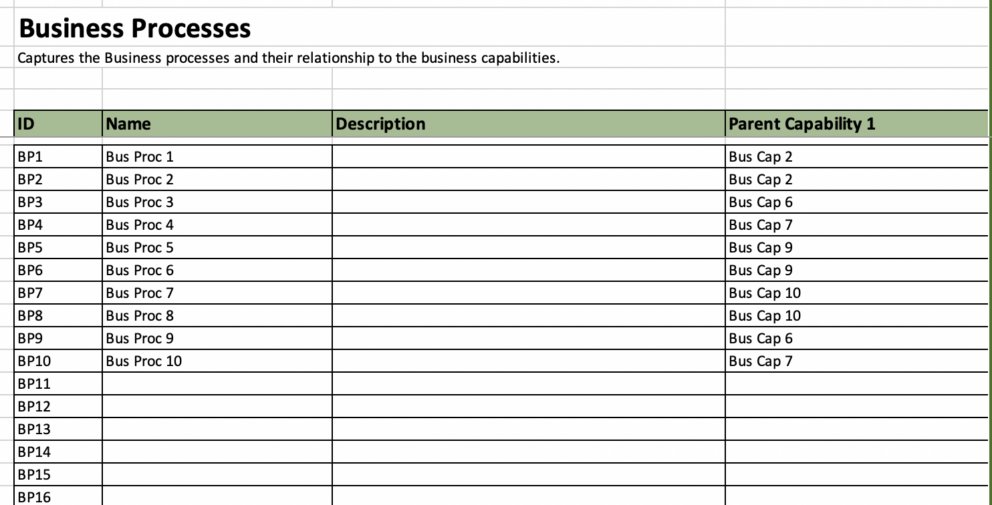
Definition Worksheets
Your definition worksheet should always have three columns in B, C and D:
- B – The ID column – ensure this is a unique identifier. We usually use one or two letters of the class name and a number, ie for Business Process BP001 onwards. Ensure each sheet has a unique identifier.
- C – Name – a free format field for the name of the class you are creating
- D – Description – a free format field for the description
- There may also be other columns related to the class you are creating. These can either be free format or a validated field, populated by linking to another class from an earlier worksheet, such as Parent Capability for a Business Process, or from the reference worksheet, for example lifecycle. In either case you use the named range and Data Validation option to validate the field and create the dropdown.
Mapping Worksheets
Your Mapping worksheets will contain two or more columns that allow you to create relationships between instances that you have captured in definition worksheets, for example, applications to application services. The have no ID column and should not be used to create new instances. Use the named range and Data Validation option to validate the field and create the dropdown.
/Reference Worksheets
You would create a Reference worksheet to hold reference data that will populate certain of the validated columns, such as lifecycle status.
Creating the Import Specification
Define the Requirements
As with creating the capture worksheet, the first step is to ensure that you understand the classes and slots you want to populate through the import spec.
Often this is obvious, e.g. a business process definition worksheet will create the business process with a description and often a parent business capability. In this case the import spec needs to populate the business process class, and also the description slot and the realises_business_capability slot.
Some are not so obvious and you will have to traverse the meta model in Essential to understand all the classes, relationship classes and slots to be created. For example, if you are creating a physical process with a supporting application you need to create the logical process (Business Process), the organisation (Group Actor) the application (Composite Application Provider) and also the relationship between them all, the APP_PRO_TO_PHYS_BUS_RELATION (Application Provider Role to Physical Business Process relationship class).
Each worksheet is self-contained and so must have all the classes required in it, for example, if you are importing business processes and parent capability the parent capability must be in the business process worksheet – you can’t re-use from other worksheets in the same Spreadsheet or Import Spec.
When creating the Import Activity, remember that the import works in sequential order, so you must create all the classes you are going to use first, which is often not the same order as the worksheet you are importing from. For example, a business process worksheet in a capture spreadsheet, with parent capability, will be ordered as follows:
- ID
- Bus Process Name
- Description
- Parent Capability
However, when creating the import spec you need to import the business capability first to enable you use it in the business process as the parent capability slot, so the order in the Import you create will be:
- Parent Capability
- Bus Process Name and ID
- Description
You must import the classes and the slots required for each class. In some cases no slots will be required, e.g. in the example above the business capability class does not require any slots, but the business process uses two slots – description and realises_business_capability. In more complex relationships many slots may be required.
Class Types
- Derived Instance – used to import all relationship classes, e.g. ACTOR_TO_ROLE_RELATION, Application Provider Role, Physical Process. This is because they join two classes together and the name must be built in the import according to the AutoText defined in Essential.
- Simple Instance – Used to import standard classes, e.g. business process, application provider
Slot Types
- Simple Slot – imports simple slots, e.g. description. The slot in the Essential meta model will NOT be Instance for these slots, usually String.
- Derived Slot – imports derived simple slots. These are simple slots, i.e. NOT an Instance slot, where some standard text needs to be imported i.e. time_year, time_quarter (to set a derived date).
- Instance Slot – imports instance slots, i.e. those slots in the Essential meta model where the type is ‘Instance Of’ a different class – business_process_supplier (Supplier Class); business_process_performed_by_role (Business Role Class)
- Primitive Slot – imports primitive slots i.e. those slots in the Essential meta model where the type is Integer (number), Boolean (true or false), Float (decimal number) – obj_to_svc_quality_is_key (boolean – determines if the objective is a KPI)
Recap
- Start by ensuring you understand what you need to create.
- Look at the meta model to understand the classes, relationships and class and slot types
- Draw a model or diagram to help you plan the import
- Make a note of the class and slots, the slot types and names and any AutoText naming conventions
Create the Import Specification – Simple Instance
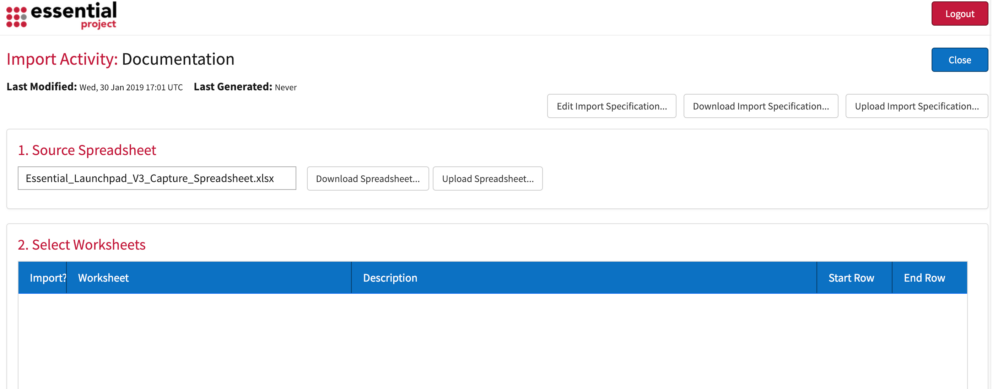
Open the Import Activity and you will see the screen below, containing:
- Source Spreadsheet – you can see the Spreadsheet that you have uploaded
- Select Worksheets – will be blank as you have not created the import yet
Click the Edit Import Specification button in the top right of the screen
You will now see the Edit Import Specification screen that allows you to create the imports according to the worksheets in the spreadsheet.
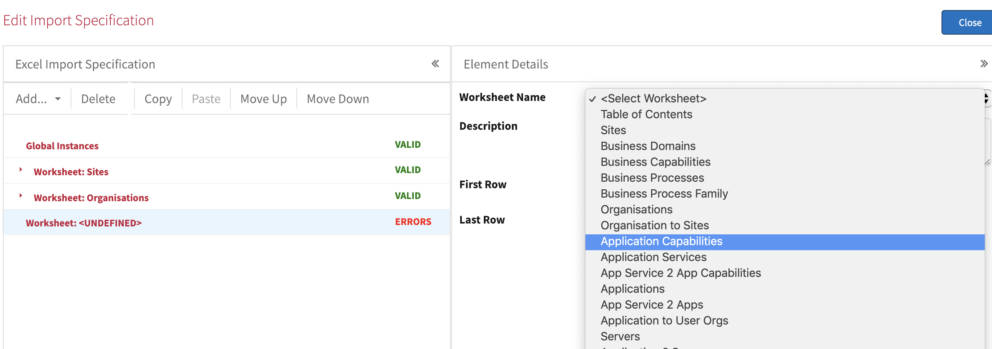
We are going to walk through an example for creating the import for the Application Capability worksheet. The worksheet has the following columns:
- B – ID
- C – Name
- D – Description
- E – Business Domain
- Select Add/Worksheet and select the Application Capability worksheet.
- Add the start and end rows – if you are not yet sure simply add the start row as 8 and the end row as 20
- Click on the worksheet name you have created and click Add and select Simple Instance from the menu
- You need to add the Business Domain first, so you can use it in the Application Capability.
- Instance Variable Name – Add a name that describes what this instance is, ie AppCapBusDom, describes that it is the Business Domain that the Application Capability belongs to
4.2 Essential Class Name – Type the name of the class i.e. Business_Domain. As you type a list of possible classes will appear and you can select the relevant class.
4.3 Instance Matching Mode – defines how the instance is matched to instances already in the repository. For this example you should select match ByID. The options available are:-
- ByName – matches based on the name. This should be used in a mapping worksheet as there are no IDs, or when you are referencing an instance that is created elsewhere, for example Business Domain in this example.
- ByID – matches based on the ID and then the Name. This should be used when the instance you are bringing in has an ID column associated with it, for example when you are creating a new instance in a definition worksheet
- ByInternalID – matches based on the Internal ID created on import
4.4 Instance ID Column – this refers to the spreadsheet column that contains the ID. In this spreadsheet there is no ID Column for Business Domain so we use the name column for both the ID and the Name. The reference in this case will be E
4.5 Instance Name Column – this refers to the spreadsheet column that contains the Name – E
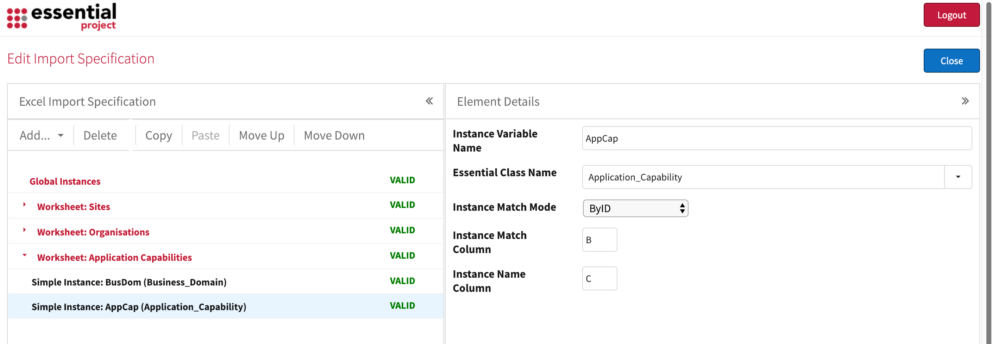
5. Now you need to add the Application Capability, so Click on the name of the worksheet again and click Add Simple Instance to add the Application Capability
- 5.1 Instance Variable Name – AnAppCap
- 5.2 Essential Class Name – Application_Capability
- 5.3 Instance Matching Mode –ByID
- 5.4 Instance ID Column – add the spreadsheet column reference for the ID column – B
- 5.5 Instance Name Column – add the spreadsheet column reference for the name column – C
6. Now add the Description. Make sure you have highlighted the AnAppCap Instance you have just added
- 6.1 Click Add and select Simple Slot
- 6.2 Slot Name – Click on the drop down box and select Description
- 6.3 Slot Value Column – add the spreadsheet column reference for the description column – D
7. Now add the Business Domain to belongs to. Make sure you have highlighted the AnAppCap Instance you have just added
- 7.1 Click Add and select Instance Slot
- 7.2 Slot Name – Click on the drop down box and select mapped_to_business_domain
- 7.3 Select Instance – Click on the drop down list and select the instance you created earlier – AppCapBusDom
- 7.4 Conditional Columns – this is the column in the spreadsheet that contains this instance. If the slot is dependant on more than one column, you can add more than one. In this case add the spreadsheet column reference for the Business Domain is – E

When imported, this will create the Business Domains with just the name field populated and the Application Capability with the Name, Description and Mapped to Business Domain fields populated in Essential.
Create the Import Specification – Derived Instance
Open the Import Activity and you will see the screen below:
- Source Spreadsheet – you can see the Spreadsheet that you have uploaded
- Select Worksheets – will be blank as you have not created the import yet
Click the Edit Import Specification button in the top right of the screen

You will see the Edit Import Specification screen that allows you to create the imports according to the worksheets in the spreadsheet.

We are going to walk through an example for creating the import for adding an Application and mapping it to the Information Representation it uses. The worksheet has the following columns:
- C – Application (Composite Application Provider)
- D – Information Representation
- E – Info Rep CRUD – C
- F – Info Rep CRUD – R
- G – Info Rep CRUD – U
- H – Info Rep CRUD – D
The Essential meta model will show that you need to add the following classes:
- Information Representation
- Composite Application Provider
- APP_PRO_TO_INFOREP_RELATION – this class is created when you add the slot – uses_information_representation to the Composite Application Provider
- The CRUD slots on APP_PRO_TO_INFOREP_RELATION
- Select Add/Worksheet and select the App Pro 2 Info Rep worksheet.
- Add the start and end rows – if you are not yet sure simply add the start row as 8 and the end row as 20
- Click on the worksheet name you have created and click Add and select Simple Instance from the menu
- You need to add the Simple Instances for Application Provider and Information Representation as shown previously
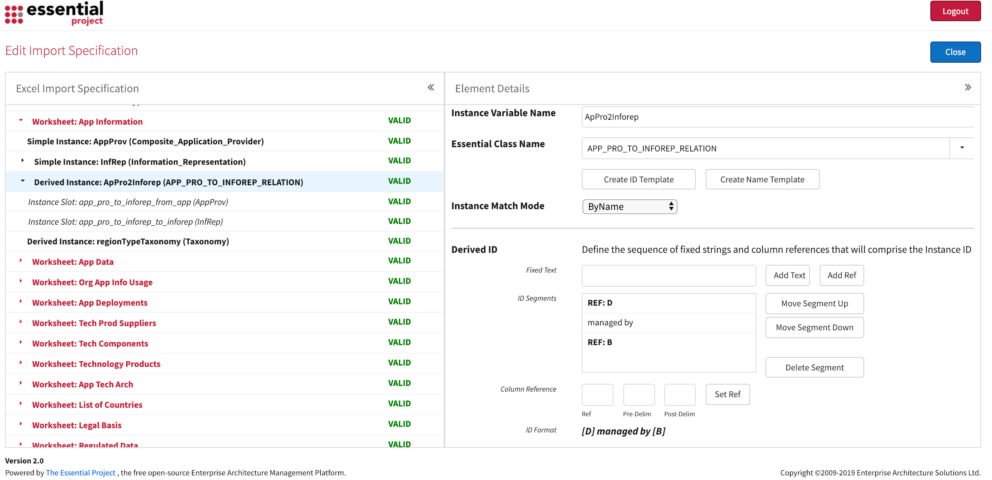
- Click on the name of the worksheet again and click Add Derived Instance to add the APP_PRO_TO_INFOREP_RELATION
- 5.1 Instance Variable Name – a name for this instance that is relevant to the worksheet, e.g. App2InfoRep
5.2 Essential Class Name – APP_PRO_TO_INFOREP_RELATION
5.3 Instance Matching Mode – ByName
5.4 Derived ID as there is no ID Column this will be set as for the name, see below
5.5 Derived Instance Name – A derived instance name is governed by AutoText. You should already have made a note of the AutoText name for this class, which is as follows:
- InfoRep managed by AppProvider
- It has two slots:
app_pro_to_info_rep_to_inforep
and – app_pro_to_info_rep_from_app - We can see that the InfoRep is column D and the AppProv is Column C
Use the Add Ref button to Add a Ref and the Column Reference field and Set Ref button to set this to D
Type managed by in the Fixed Text field and click the Add Text button to add it
Use the Add Ref button to Add another Ref and the Column Reference field and Set Ref button to set this to C
So the format will be Ref D managed by Ref C (InfoRep managed by AppProv)
- 5.1 Instance Variable Name – a name for this instance that is relevant to the worksheet, e.g. App2InfoRep
5.6 Derived Instance Name – this should be the same format as the Derived Instance Name, so follow the instructions above
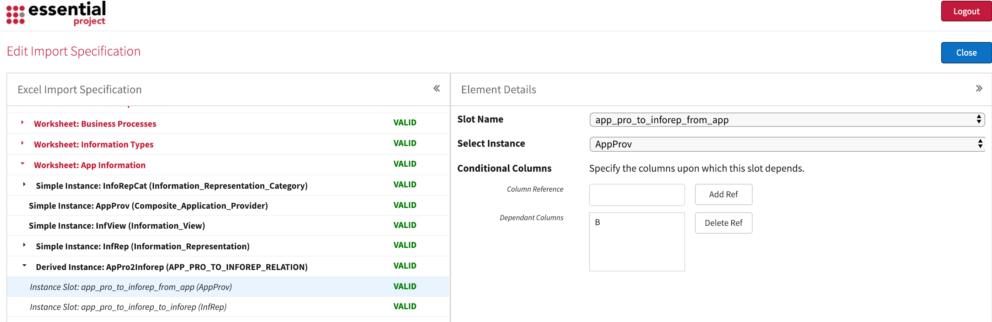
5.7 Now you need to set the two slots:-
Instance Slots:-
- Set the InfoRep
- Slot Name – app_pro_to_info_rep_to_inforep
- Select Instance – the InfoRep you added earlier
- Conditional Columns – Column D
- Set the App
- Slot Name – app_pro_to_info_rep_from_app
- Select Instance – the Composite Application Provider you added earlier
- Conditional Columns – Column C
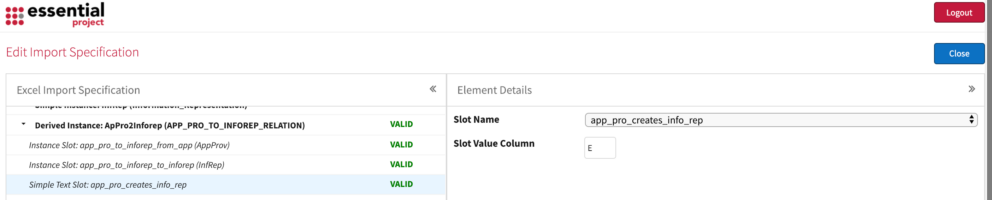
Simple Slots
- app_pro_creates_info_rep – column E
- app_pro_reads_info_rep – column F
- app_pro_updates_info_rep – column G
- app_pro_deletes_info_rep – column H
Test the Import Specification
You can test an Import Spec worksheet by worksheet, or wait until you have completed the spec for all worksheets in the spreadsheet.
- Go into Essential and check that the classes and slots have been created correctly. You can also use viewer to check that the view you are creating is as expected.
- If your spreadsheet contains many rows you may find it easier to just import a small number of rows, i.e. 10, for the initial test and then import and check the whole spreadsheet once you are satisfied the import spec is correct.
- You should still test the whole spreadsheet to identify any other issues, for example invalid text fields.
Updated 31 October 2023